I recently visited a parallax scrolling website that was just one of thousands of different parallax scrolling websites out there. One thing that I immediately noticed was that the scrolling FPS of that page was really bad. I suspected that there would be room for improvement in their parallax implementation, and I wanted to take a look to see if there was anything I could do to improve it.
I’m not going to link to that website or tell you its name. Why? Simply because it is a live website and they can change their parallax implementation at any moment, and that would probably distract people reading this blog post.
I was interested to see what I could do to increase performance by modifying the original code as little as possible. I’ll show you five fixes that give the website a nice performance boost.
Finding out what is wrong
First of all, what causes bad scrolling performance (low FPS)? Well, that is a tricky question. It can be caused by almost anything related to your page: images, CSS or Javascript (or all of them).
HTML5 rocks article called “Scrolling Performance” gives some explanation for low parallax scrolling FPS:
…Whenever you scroll a page the browser will probably need to paint some of the pixels in those layers (sometimes called compositor layers). By grouping things into layers we need only update that specific layer’s texture when something inside that specific layer has changed, and where we can we want to only paint and rasterize the part of a render layer’s texture that’s been damaged rather than the whole thing. Obviously if you have things moving as you scroll, like in a parallax site, then you’re potentially damaging a large area, possibly across multiple layers, and this can result in a lot of expensive paint work.
– Paul Lewis, in Scrolling Performance
Chrome’s developer tools help a lot when investigating problems like this, so I used Cmd + Opt + J (Ctrl + Shift + J on Windows) to open dev tools on the page and went to “Timeline” and clicked “Frames”.
This is the initial FPS recording of the website:*

It is better that I explain what is going on here.
The x-axis of the image: represents time, in this case something close to 5 seconds of scrolling.
The y-axis of the image: green color of the bars indicate that the browser mostly spends time on doing “paint”: painting the content on user’s screen. Longer bars (that go above the 30 FPS mark) happen when a parallax background image gets shown. The bad thing is that there are three long, low FPS bars (< 30 FPS) in a row for each parallax image. That makes scrolling feel sluggish.
*If you are not familiar with the timeline view in Chrome dev tools, take a look at the official documentation (helps to understand the images in this blog post).
The parallax technique used
Let me try to explain the parallax scrolling technique that the website is using.
There are div elements on the page that all share the same .parallax-bg CSS class. On Javascript side jQuery is used to loop through those elements and read a data- attribute that holds a filename for an image.
Each parallax background image is then asynchronously loaded with Javascript by creating a new img element and setting the filename to its src attribute.
Created image elements get appended to a new div element that is appended to the page. Each new div element has CSS transform: translate3d(0px, y, 0px); set, where y is the vertical position for parallax effect in pixels (e.g. -620px).
Inside a scroll event handler there is a “visibility” check, so that only one parallax image is visible when user scrolls. On scroll translate3d’s y value is updated for only the currently visible image (creating a parallax effect).
Fix 1. Don’t put scroll/resize event handlers inside a loop
Looking at the code, I could see that there had been some effort in trying to do the correct thing by caching image references and then attaching one scroll event listener that looped through all parallax images.
…but that code looked unfinished and was commented out. Looks like the developer(s) ran out of time and instead decided to attach the $(window).on('scroll') and $(window).on('resize') event handlers for each parallax image inside a $('.parallax-bg').each(function() {}); loop.
This means that every time you scroll (or resize), an event handler is called for each of the images. Depending on what kind of work you do inside your scroll event handler, this can potentially be bad for performance.
Here is the code that loops through the images that are on the page. Yeah, I’ve stripped out all the unrelated code to keep it clean.
1 2 3 4 5 6 7 8 9 10 11 12 13 14 15 16 17 18 19 20 | |
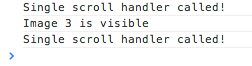
By putting a console.log inside the scroll event handler and then scrolling, the console tab gets flooded with messages from each event handler:

To fix it the code needs to be changed a bit, so here is my suggestion. I’ve written fixes as Javascript comments and marked them with numbers 1. - 6.
1 2 3 4 5 6 7 8 9 10 11 12 13 14 15 16 17 18 19 20 21 22 23 24 25 26 27 28 29 30 31 | |
Great! now only one event handler gets called when you scroll. On scroll the parallaxImages array is looped and we can use the existing check to see if the image should be visible or not.
Fix 2. use requestAnimationFrame for resize and scroll event handlers
It might not be that obvious, but attaching a scroll event handler can in some cases be really costly for your website’s performance. The reason for this is that by default the event handler gets called a lot, possibly several times per a frame when you are scrolling the page. If you are reading/writing values to the DOM or updating layout of your page directly in your scroll event handler, it will usually have a bad impact on the scrolling performance.
So what is the deal with requestAnimationFrame? It basically allows the browser to run your event handler (or any other function that runs frequently) when it is free to do new paint work on the screen.
“The window.requestAnimationFrame() method tells the browser that you wish to perform an animation and requests that the browser call a specified function to update an animation before the next repaint. The method takes as an argument a callback to be invoked before the repaint.” - MDN
Let’s see what Paul Irish has to say about scroll and resize event handlers and requestAnimationFrame:
There are only a few things you should ever do inside a resize event or a scroll event… …inside a scroll event you can ask for, lets say, the scrollTop() metric… you can also ask for the time… and that’s about it. You do not want to do any other work inside the handler! Do the work that you want to do inside a requestAnimationFrame()
– Paul Irish, in Chrome Office Hours: Performance
The fix is simple: just include requestAnimationFrame polyfill for better cross-browser support, and give your scroll event handler to requestAnimationFrame.
1 2 3 | |
After using a single scroll event handler + requestAnimationFrame, the timeline recording started to look a bit better already:

Fix 3. Avoid resizing big images
After first two fixes the timeline still has huge spikes (FPS drops) every time a new parallax image is shown. A Recording shows why:
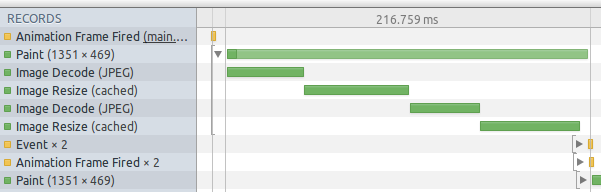
Long green bars indicate, that a lot of time (150-200ms) is spent on painting a big area of the screen: resizing, decoding and showing a JPEG image. The timeline recording shows a painted pixel size of 1351x469 pixels. Inspecting the images reveals that all parallax images have a resolution of 3000x2000 pixels, so the actual painted area is much smaller than the resolution of the image. This means that the browser needs to do extra work to show the image on screen.
…If you’re sending large images to a device and then scaling them down using CSS or image dimension attributes, you’re more likely to see this happen. Of course the amount by which the browser has to rescale images, and the frequency with which it has to do this, is going to affect your page’s performance as they happen on the main browser thread, and therefore block other work from taking place. The case for sending images that can be rendered without any resizing, therefore, is very strong.
– Paul Lewis, in Scrolling Performance
Rather than resizing a big image, you could create at least 6-10 different resolutions of the same image (you can look at your website’s analytics to see what are the most common resolutions), and use a responsive image solution, like Picturefill to serve an image that is closest to visitor’s current browser window size.
I did a quick fix by just resizing all images to match my 1360x768 resolution. This caused the JPEG decoding time to drop from ~50ms to 30-35ms for each image. I know that it does not sound like a huge win in terms of time, but it actually helps in enabling next fix (fix 4).
Fix 4. Remove background-size CSS property if it slows down your website
Using background-size: 100% is good if you want to make sure that your background images automatically fit nicely to match the size of visitor’s browser window. If you use it for your parallax background images, those images probably have to be resized to fit your screen every time an image is shown on the screen, which is bad for performance.
But if you use some kind of responsive image solution, there might not even be a need to use background-size, so remove it from your code to get a nice performance boost!
Let’s take a new recording and see how it looks like:

Bonus fix: experiment with translateZ(0) on the images
Using CSS transform: translateZ(0); on the images is something that can further increase performance, but I don’t recommend using it unless you are fully aware of what it does. Basically, it is considered to be a hack that usually forces the rendering to happen on GPU.
…Many times people just use the -webkit-transform: translateZ(0); hack and see magical performance improvements, and while this works today there are problems: 1. It’s not cross-browser compatible. 2. It forces the browser’s hand by creating a new layer for every transformed element. Lots of layers can bring other performance bottlenecks, so use sparingly! 3. It’s been disabled for some WebKit ports.
– Paul Lewis, in Parallaxin’
In my case adding the transform: translateZ(0); hack to parallax images increased overall FPS in Chrome, but in some other case it could possibly create performance issues, so beware!
What about other fixes?
I could possibly make further performance optimizations by doing a refactor for the website’s code, but honestly I don’t have time and really don’t feel like doing that.
One thing that I wasn’t sure about was that is it possible somehow to get rid of the previously mentioned ~35ms image decoding cost when an image gets shown by the browser (display: none -> display: block). Looks like that is causing the remaining spikes that are visible in timeline recordings.
Conclusion (tl;dr)
Low parallax scrolling FPS is relatively easy to increase once you are able to recognize possible performance bottlenecks.
By combining all of the performance improvement tricks mentioned in this post, I managed to increase the overall FPS of the website so that the FPS drops only a couple of times shortly to 50 or 40, but does not drop under 30 at any point. This means that there are no more hiccups when scrolling.
FPS before any fixes*
After single scroll event handler + rAF*
After bg image fix and removing background-size*
After translateZ(0), all fixes*
![]()
*Widths of the green bars differ a bit because the scrolling time and distance was not _exactly_ the same every time.
Resources
Parallax related
- Parallaxin’ by Paul Lewis
- Adventures in Jank Busting: Parallax, performance, and the new Flickr Home Page by Scott Schiller
Paul&Paul investigating rendering problems
Layout and rendering
- Solving rendering performance puzzles by Jake Archibald
- Scrolling Performance by Paul Lewis
- Improving Web App Performance With the Chrome DevTools Timeline and Profiles by Addy Osmani
- Gone In 60 Frames Per Second: A Pinterest Paint Performance Case Study by Addy Osmani
- On Layout & Web Performance by Kelly Norton
Image rendering performance
requestAnimationFrame
- Request Animation Frame for Better Performance by Jon Raasch
- Mozilla Developer Network: window.requestAnimationFrame
EDIT: 2013-09-01 - Small spelling & grammar fixes